Monday, August 26, 2019

Pinkfresh August Challenge: Stitching!


If you're familiar with my or my blog, it's no secret that I love stitching.  So when I learned that Pinkfresh's August challenge was stitching, there was no way I wasn't participating.  What a great reason to stitch up a card!

I used Pinkfresh's Fancy Blooms stamp set for this card.  I first stamped out my images in the corners of an A2-sized card base cut from Neenah Solar White 110# cardstock.  I then did some super simple Copic coloring because I knew the stitching would be the star of the show.  I then used coordinating thread colors to achieve a no-line stitching look.  I pierced holes along the stamp lines and backstitched with 2 strands of floss along the lines.  This takes time, but I find the process so soothing and meditative.  It's the perfect activity to re-binge watch your favorite shows... not that I'd know this from experience or anything.  *wink*   


After finishing all my backstitching, I added some French knots in my flower centers and along some floral stems.  I LOVE French knots in cardmaking... they add such whimsy and texture to the finished product!  


After I finished the stitching, I die cut my "Hugs" sentiment from pink cardstock and adhered several layers together so it has some dimension.  I used some flower and leaf sequins here and there for some sparkle, and some mulberry rosettes in the larger flower centers for even more interest and dimension.  I mounted the panel on some black and white plaid patterned paper to finish the card.  

I wish photographs could truly capture the magic that stitching adds to paper crafting projects.  This card has such lovely texture from all the thread... it is actually soft when you touch it.  I hope this inspires you to add some stitching to your paper projects - I know you'll love the results!  


A link to the stamp set I used is below.  Thank you so much for stopping by today.  I hope you enjoyed this project as much as I loved making it!


Thursday, August 8, 2019

Gouache and Watercolor Card with MFT's Carousel Horses


I love any excuse to pull out my paints, and this is exactly what I knew I wanted to do when I saw My Favorite Things's new Carousel Horses stamp and coordinating dies.  These little horses are so sweet and the matching carousel die is AMAZING... there are so many possibilities with these sets!

I wanted one special horse to be the focus of my card.  I stamped my horse, painted her with gouache paints, and used the coordinating die to cut her out.  I then die cut a frame using MFT's Stitched Rectangle Scallop Edge Frames out of gold cardstock and a pole for the horse out of mirror gold cardstock.  I then used the Carousel die to cut out a floor and tent... so easy!


I wanted to create an ethereal background, so I blended some pink ink, splattered it with water, then used Tsukineko Shimmer Spritz for a pretty glow.  I then used gold embossing powder to add my sentiment to the bottom of the card.  I die cut the panel using MFT's Stitched Rectangle Die-Namics and added some gold stitching for interest.

All that was left to do was layer my pieces together.  I used foam tape behind all of the elements to give them dimension.  A few sparkly gold sequins and this sweet carousel horse card was finished!


I hope you enjoyed this project!  Links to the products I used are below.  I participate in the My Favorite Things affiliate program, which means that I receive a small commission at no additional cost to you when products are purchased through the links I share.  I truly appreciate your support!

I'll be back soon with another project using more products from MFT's August release.  Thanks so much for stopping by and have a wonderful day!


Wednesday, August 7, 2019

Stitched Watercolor Card Using My Favorite Things Abstract Doodle Stamp Set


Oh my, this card was so much fun to make!  My Favorite Things's new Abstract Doodle stamp set is so fun and has so many creative possibilities, and I knew I wanted to try adding some stitched details to enhance stamped image.

This card came together so easily.  I first stamped my image onto a piece of Distress Watercolor Cardstock.  I then used Distress Ink in a rainbow of colors and painted an abstract piece, just playing around with colors (i.e., there was no rhyme or reason here!).  After the piece dried, I then simply took out my embroidery thread and did a simple backstitch over the stamped lines, changing colors so the thread would match whatever color was underneath.  This went so fast and was so easy, and I love how it gives the doodle some texture!


I added my Hello sentiment using the Little Hello die (currently free with a $60 purchase!), layering it on top of vellum so you can still see all that stitching underneath.  I made the little sentiment strip from the And with that, this fun, colorful card was done!  I am so happy with how this came out!


I hope you enjoyed this project!  Links to the products I used are below.  I participate in the My Favorite Things affiliate program, which means that I receive a small commission at no additional cost to you when products are purchased through the links I share.  I truly appreciate your support!

I'll be back soon with another crafty project.  Thank you so much for stopping by!


Stitched Floral Accents Featuring My Favorite Things Little Hello Die-Namics


Hello, crafty friends!  I am so thrilled to be here with this new card featuring My Favorite Things's new Little Hello die from their August release!  If you take a look at my cards, it is no secret that I love a good "Hello" die.  It is one of the most universal, useful sentiments applicable to so many different recipients and events.  I have a container of my most used dies on my creating table, and this die has already made its way in there!

I decided to create a card featuring colorful stitched floral elements to highlight this classic sentiment.    To create my flowers, I used MFT's More Rustic Wildflowers stamp set to stamp my flowers in light ink directly on pool-colored cardstock.  I also used MFT's Fab Foliage and Royal Leaves Die-Namics to draw on some additional leaves and stems.  I then painted over the images with gouache.  Gouache is a fantastic medium for paining directly onto colored cardstock due to its opacity... I just love this technique and the striking effects you achieve with this paint!

I wanted to add some stitched details to my flowers, so I used the same light gray ink to stamp the floral accent layers directly onto the gouache.  Once the ink was dry, I simply poked holes over the ink and did simple backstitches to create the floral accents.  This gives the flowers such wonderful texture and dimension!


I mounted my "Hello" sentiment onto a layer of vellum in the center of the card.  All there is left to do is add a sentiment strip when I am ready to send the card.  I keep a little bowl of these sentiments on my desk... they always come in handy when I'm ready to personalize a card for a special event or recipient!  These sentiment strips were created with MFT's Woodland Friends stamp set.


The Little Hello die is currently free with a $60 purchase at MFT... how great is that?!?  You can find more info about that here.  I hope you enjoyed this project!  I'll be back soon with more projects from MFT's new release.  Thank you for stopping by!
Tuesday, August 6, 2019

Three Unexpected Ways with a Rainbow Die: My Favorite Things August Release


Hello, crafty friends!  I am so thrilled to be here today with three cards I made using My Favorite Things's new Rainbow Bright die from their August release.  If you'd like to see all of the lovely MFT & Friends creations featuring the new products, you can find MFT's post here

I LOVE a good rainbow die, and this one is my absolute favorite of all.  I love the thickness of this rainbow and how it is great for both portrait and landscape cards.  It is striking and perfect on its own, but I thought it would be even more fun to think of ideas how to make it even more interesting using embroidery thread.  I used it I kept thinking of different ideas... thus my three different projects here today!  


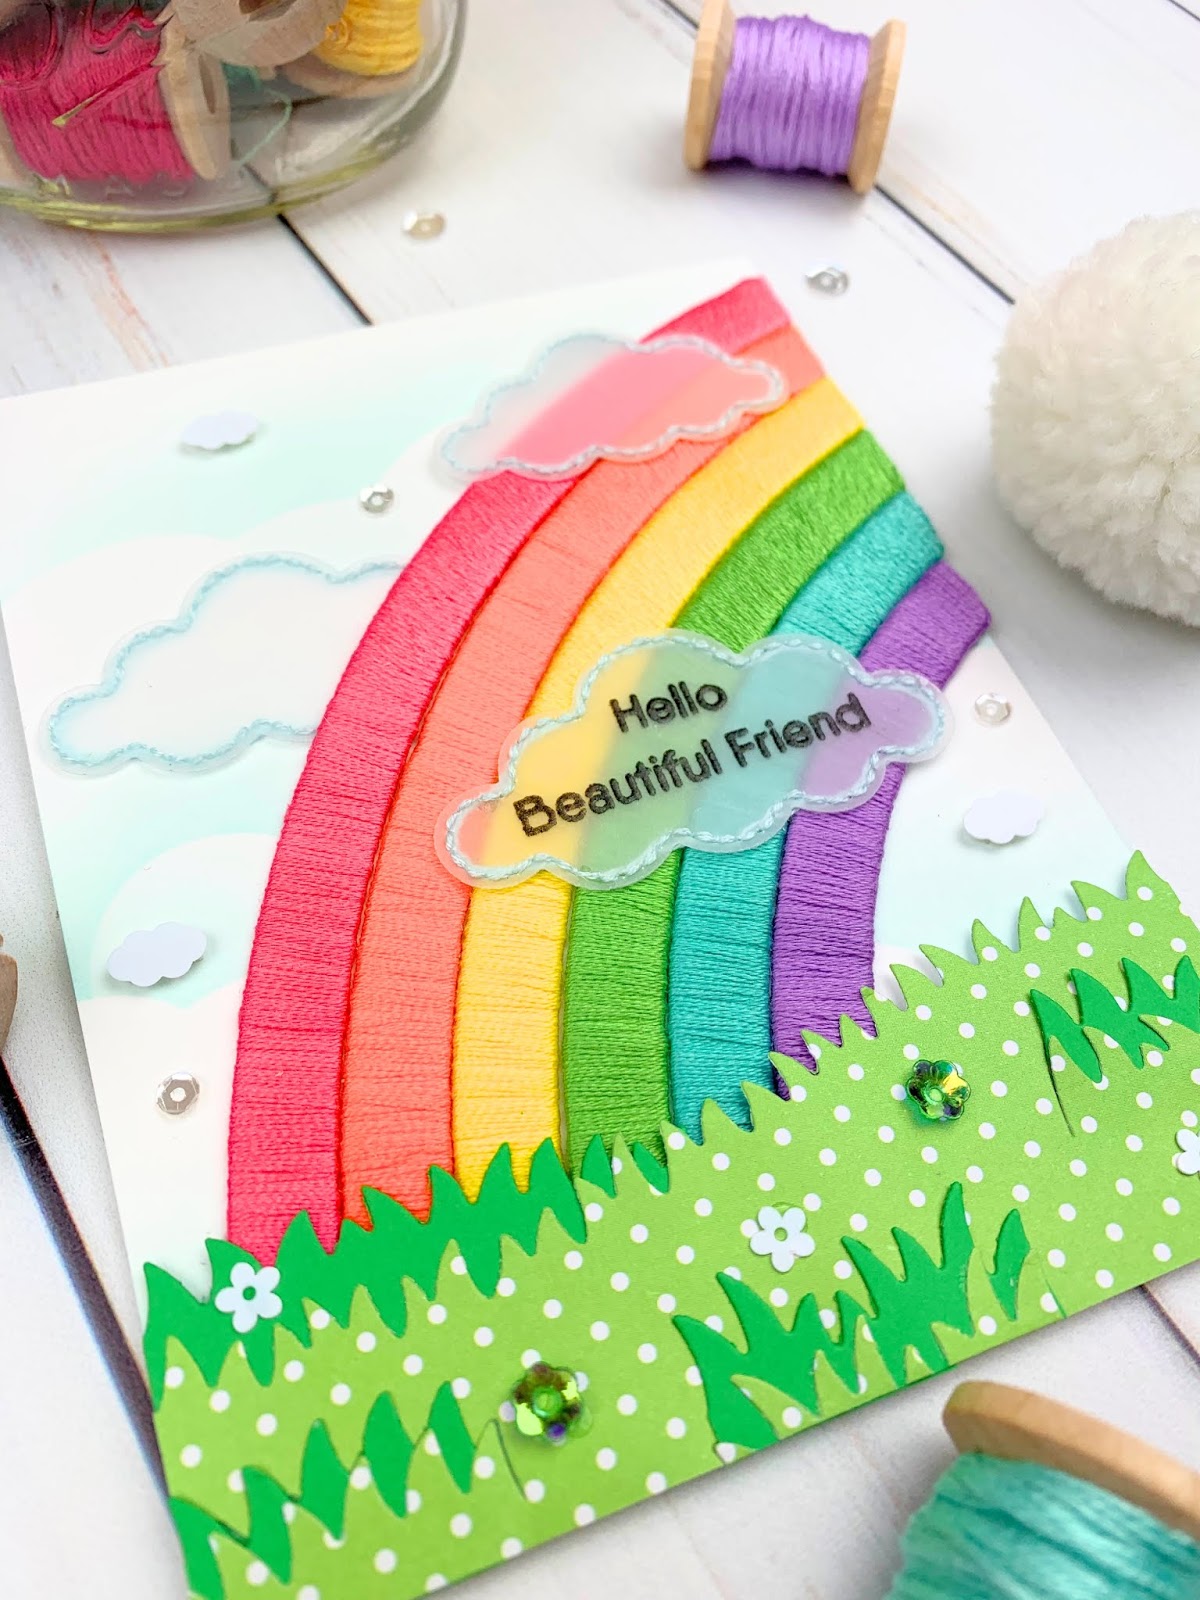
My first idea was to take the individual arcs and wrap them in embroidery thread to give the rainbow lots of texture and dimension.  This process was really simple.  I first colored the individual rainbow pieces using Copic markers in case I ended up with any gaps in my thread, thereby avoiding any white spaces showing through.  I then covered the back of each piece with strong double-sided tape.  Using all 6 strands of DMC embroidery thread, I started the process by sticking the end of the thread to the back of the die cut at the edge and then wrapping the thread around the arc.  This process went surprisingly fast and didn't use as much thread as I had initially thought (the largest piece used just under half a skein of thread).  I used some liquid adhesive at the edge to make sure the thread was nice and secure.


To finish this card, I created a panel using MFT's Cloud stencil and used the Stitched Clouds Die-Namics to die cut some vellum clouds.  I stamped my sentiment from the Hello, Beautiful stamp set onto one of the clouds and heat embossed it.  I added some stitching around the clouds and adhered them to the card.  I also added some grass with MFT's new Tucked-In-Turf Die-Namics, dotting some floral sequins here and there.


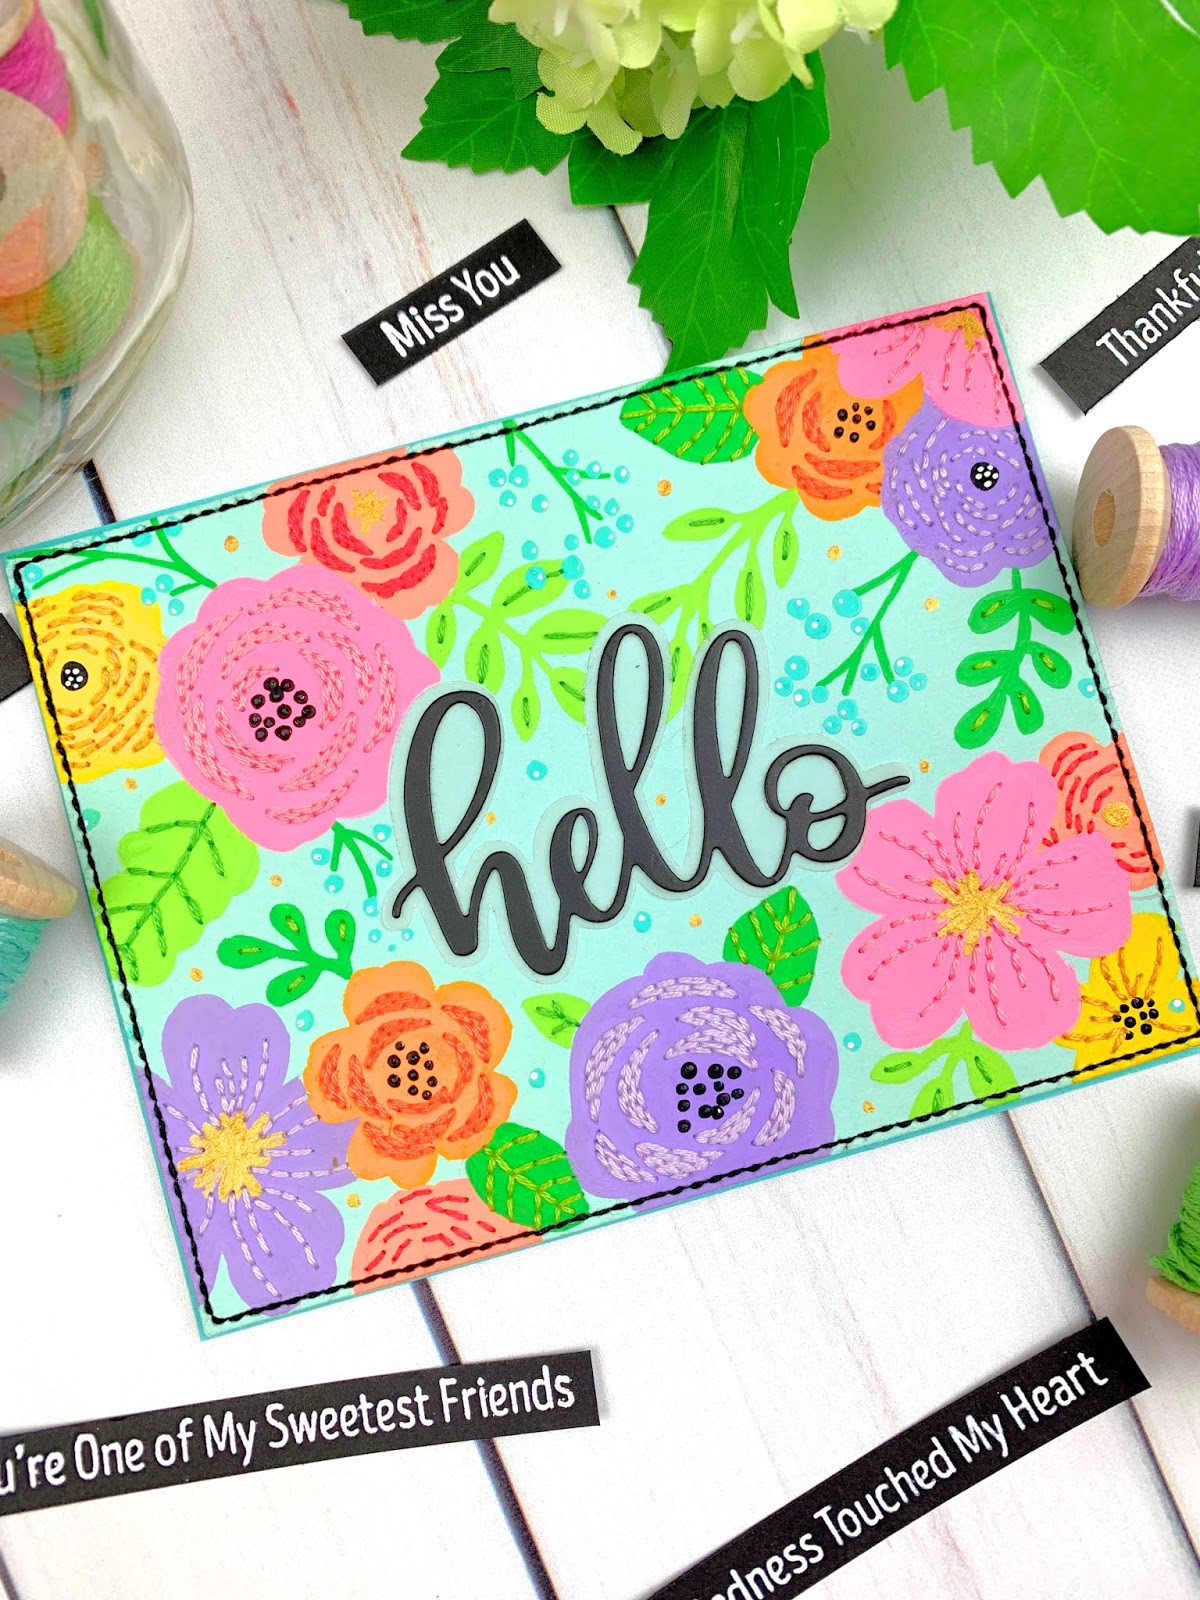
For my second card, I did some straight-up and easy stitching to create my rainbow.  I used the rainbow pieces as stencils, tracing them onto a panel.  I masked off the rainbow and created a cloud background using the Cloud stencil.  I then colored the arcs in with Copic markers and did simple backstitching along the lines.  So easy!  I die cut the clouds with the Stitched Clouds Die-Namics out of white wool felt, again adding stitching along the edges.  I added my sentiment with the new Little Hello die, mounting it onto a translucent base of vellum.  Some sequins here and there and this card was finished!


My third card was definitely my most detailed.  Using the same technique as the second, I used my die cuts as stencils and created my colored rainbow on a background created again with the Cloud stencil.  I then die cut a cloud using the cloud from MFT's End of the Rainbow die set to create a shaker window.


This time, instead of stitching only the borders, I stitched the entire rainbow using a brick stitch.  This simple stitch is essentially a back stitch with the rows slightly staggered.  I wrapped the ends around the cloud and the edge of the card, using liquid adhesive to secure them.


I then backed my cloud with some acetate, added some cloud and clear sequins, and backed the card using foam tape onto a sky blue panel.  Some sequins and a "Hello" from the Little Hello Die-Namics and this card was finished!


I am so thrilled with this happy trio of rainbow-y goodness!  These projects were so much fun to make.  I am actually taking another rainbow panel on a plane ride with me soon - another brick stitch rainbow is definitely in order!  I'm thinking some pretty pastels next time.

I hope you enjoyed these projects today!  I am so thrilled to be a part of the MFT & Friends feature for this new release!  I'll be back soon with another crafty MFT project.  Thanks for stopping by and have a great day!
Monday, August 5, 2019

Spellbinders August Small Die: Pack It Up!


OK Spellbinders, you win.  You win the award for the CUTEST, most perfect-for-teachers die set... ever.  I can't EVEN with this set, you guys.  It is one of my absolute favorites, hands down.

I sat down with this August Small Die of the Month ready to make a cute backpack.  I ended up making three backpacks, notebooks, glasses, pencils... I just couldn't stop.  These little backpacks are not only replete with the sweetest details, but they are interactive!  You open the top and you can tuck in all of the cute little accents included in this set (this would also be a great place to tuck in a little handwritten note from a child to a teacher).  I dug through my hoard stash of my favorite patterned papers and designed some gorgeous trendy little backpacks (seriously... I have a big of a bag addiction and I wish I could find real backpacks in these patterns!) in bright, fun colors.


I assembled the card with some strips of coordinating patterned paper, adding in little die cut accents from the kit and some hand stitching here and there.  But I was surrounded with tons of beautiful paper so I just kept die cutting, making a trio of the coolest die cut backpacks ever.  I am not kidding when I say that all of my daughter's teachers will be receiving one of these backpack cards at some point this year!


You can find the Spellbinders Die of the Month here.  I participate in the Spellbinders affiliate program, which means that I receive a small commission at no additional cost to you when products are purchased through the links I share.  I truly appreciate your support!

I hope you enjoyed this project as much as I loved making it!  I'll be back with another crafty project soon.  Have a wonderful day!


Custom Post Signature

Custom Post Signature