Sunday, November 29, 2020

Simon Says Stamp Diecember 2020: Stitched Rainbow Card Featuring CZ Design Hugs Die


Hello, friends!  I am so happy you stopped by for yet another exciting Simon Says Stamp Diecember release!  I made this stitched card with the new CZ Designs Hugs dies.  This is one of those staple dies that I am so happy to have in my collection... I can't get enough of the clean and simple font.  


I started my card by stitching a rainbow heart using Simon Says Stamp's Rainbow Heart die (another favorite).  For a tutorial on how I stitched this die, you can check out this post.  I then used Concord & 9th's Brighter Days die set to attach a cute yellow sun to the corner of my heart.  


I then chose an Avery Elle stitched postage die (similar is here) and used a simple backstitch to add stitching along the edge.  Before adhering everything down, I used a smaller "Everything will be alright" sentiment from Simon Says Stamp's Messages for Everyday stamp set in the corner of an A2 white cardstock base.  I them adhered my postage frame and heart inside using foam tape for dimension.  For my sentiment, I die cut several layers of black cardstock using the Hugs die, adhering it on top of the heart (and adding foam tape where needed).  To finish, I added some shine to my sentiment using Tonic crystal glaze and some hearts from the Concord & 9th's Brighter Days dies. 


I had so much fun making this project and I hope you enjoyed it!  I can't wait to check out the new dies coming to us this month... I am a die cutter at heart and this is one of my favorite releases every year!  Thanks so much for stopping by and I'll see you again soon with another papercrafting project.   


Friday, November 20, 2020

Pinkfresh November 2020 Essentials Die Release: Stitched Floral Card Featuring Diagonal Stitched Plaid Die


Hello, friends!  I am thrilled to be participating in Pinkfresh Studios' November Essentials Die Release, and I'm so happy you stopped by!  You may be stopping by from Lea Lawson's blog (you can see the list of all blog participants below).  This blog hop is full of gorgeous inspiration using Pinkfresh's new dies, all of which are diecutting staples that add such beautiful dimension to cardmaking projects.  Stay tuned on how to win a $25 gift card from my blog... details are below!  Woohoo!  


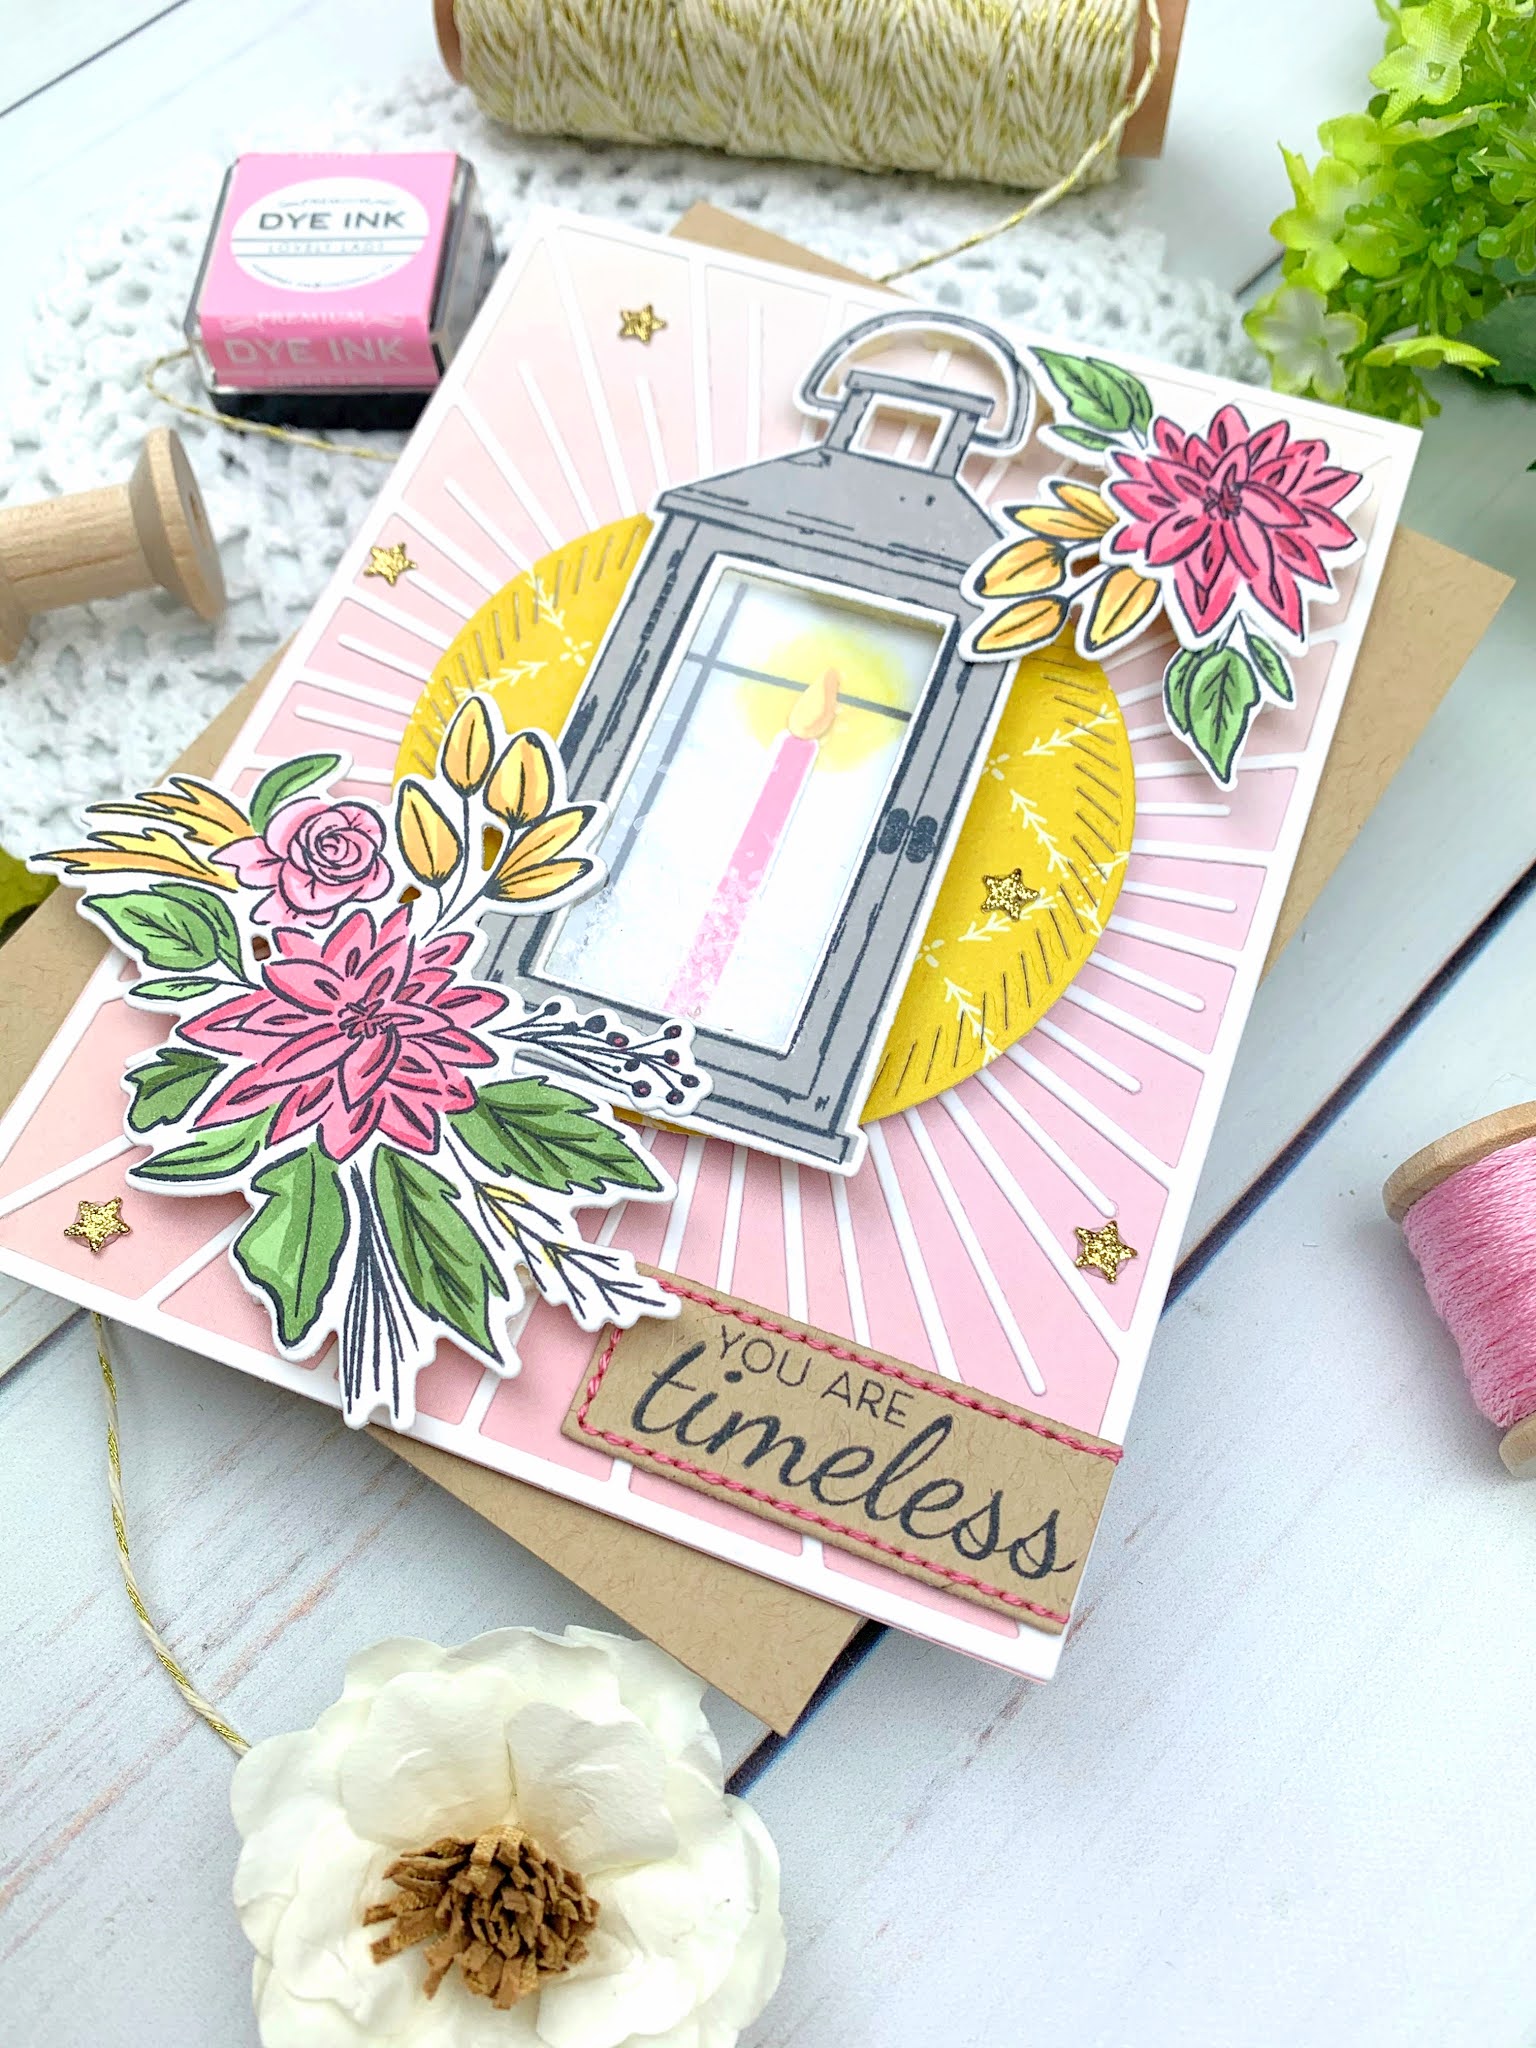
My project today features the new Diagonal Stitched Plaid background die.  If you know me at all, you know I love anything stitched.  And I love die cutting.  So I decided to highlight the stitched feature of this background die by adding lots of floral die cuts enhanced with hand stitching.  To start, I die cut my background panel onto a piece of blush cardstock and ink blended Pinkfresh Studios' Ballet Slipper and Coral Reef inks using a blending brush in a light gradient from top to bottom.  


I then die cut a bunch of floral images from Pinkfresh's Lovely Blossoms stamp set onto white cardstock.  Before I cut them out, I poked holes into the floral and foliage images and used 2 strands of embroidery floss to add simple backstitching and french knots (tip: I recommend adding stitched details before cutting the images out because they are small and a little unwieldy to handle once they are cut out).  Once the stitching was done, I fussy cut the images out (another tip: even though I have the coordinating dies for this set, I find that die cutting smushes the stitching down, especially french knots.  Fussy cutting yields better results, and don't worry about getting them perfect.  All the details bring the eye away from any imperfect edges!) 


I then used Pinkfresh's Leafy Wreaths die set to cut two wreaths out of white and green cardstock.  I adhered the green wreath to my plaid cardstock panel, then adhered the white wreath on top, rotating it a bit so the wreaths were not perfectly aligned.  I also spent some time fluffing up the white leaves on the top wreath to create dimension.  I then arranged my florals on top of and around this wreath, using foam tape when needed to pop the florals up over the leaves. 


I die cut the center of the wreath from dark gray cardstock and heat embossed my sentiment in two colors from Pinkfresh's Flower Garden stamp set.  I used some white pigment ink and a blending brush to create a bit of a chalkboard effect, then added a few french knots here and there.  Once I adhered the center to the wreath, this card was finished! 


GIVEAWAY + PROMO!

I hope you enjoyed this project!  To enter for a chance to win a $25 gift card, leave a comment on my blog (I'd love to hear what your favorite new product is!).  A winner will be chosen from the comments and will be posted to the Pinkfresh Giveaway Page on November 30, 2020.  Winners will have 2 weeks to claim their prize.  GOOD LUCK!  


Pinkfresh is also discounted shipping and a FREE Hey Gorgeous die for all orders over $50! 


Your next stop on the blog hop is Maria Willis.  A list of all the blog hop participants is below.  Thanks again for stopping by and have fun on the hop! 


You are invited to the Inlinkz link party!

Click here to enter
Saturday, November 14, 2020

Stitched Card and Tag Featuring Ink to Paper's In Stitches: Candy Swirl Dies


Hello!  Thanks so much for stopping by today for these papercrafting projects featuring Ink to Paper's new In Stitches: Candy Swirl dies.  These projects were a breeze to make using these fun stitching dies! 


I die cut two candy pieces using the dies from white, Lovely Lady, and Pure Poppy cardstock and stitched them together using coordinating shades of embroidery floss (hint: the stitch holes are big, so I used all 6 strands of floss for these projects).  I also hand beaded some sparkly sequins to the candies.  These beautiful die cuts are the stars of the show, so it didn't take much embellishing to finish the projects.  For my card, I die cut some foliage from the Tree Essentials stamps and dies and the Corner It: Holly stamps and dies, adding stitching to the little holly leaves for added interest.  For my card, I created a lollipop stick from a thin stipe of cardstock and adhered it to an Aqua Mist panel I cut using the new Border Bling: Twinkle die (I had popped this panel onto a white card base using foam tape for some dimension).  I then adhered my foliage to the stick and added a red bow.  For my sentiment, I used the Joyous Holiday stamps, stamping it on vellum with Versafine ink and heat embossing it with clear embossing powder.  


My tag came together in the exact same way, except I added twine to the top.  I think this would also make such a cute Christmas ornament!  


Thanks so much for stopping by today to look at these projects!  They were such fun to make.  I hope you've enjoyed the design team's projects with the new November products, and I can't wait to see what you make!  


Gouache Floral Shaker Card Featuring Ink to Paper's Abundant Blooms and Inside Greetings: Feel Better Stamp sets


Hello!  Thanks so much for stopping by today for this gouache floral shaker card highlighting Ink to Paper's new Abundant Blooms and Just Sentiments: Get Well stamps.  This card was so much fun to make and I'm excited to share the process with you! 


I started my card by selecting a panel of Sweet Blush cardstock cut to 4 x 5.25 inches.  I stamped stems onto the cardstock and heat embossed them with green embossing powder.  I then stamped my blooms from the Abundant Blooms to the panel using light-colored ink.  I then mixed some shades of dusty rose and earthy yellow gouache to pain over the blooms.  The abstract nature of these flowers made this so easy... I think I was done in about 10 minutes!  I then chose some flowers from the Birthday Bouquet stamp set, stamped them onto Sweet Blush cardstock, and again painted them with gouache.  I die cut the florals and popped them up onto the bouquet with foam tape. 


I then stamped the vase from the Clearly in the Vase Mini Stamp Set, selectively stamping it to make it a bit shorter.  I then fussy cut my shortened vase out, cut out the center and adhered a piece of acetate to the back.  I used thin strips of foam tape to pop it up, adding clear sequins into the middle for a sparkly shaker effect.  After that, all that was left to do was stamp my sentiment from the Inside Greetings: Feel Better stamp set onto some Pale Peony cardstock and adhere it to my frame. 


I love this sweet card and I hope you enjoyed it, too!  Links to the products I used are above.  Thanks so much for stopping by today and I'll see you again soon with another Ink to Paper card project!  


Friday, November 13, 2020

Vellum Shaker Card Featuring Ink to Paper's Feathered Friends 6 Mini Stamps and Just Sentiments: Together Stamps


Hi, friends!  Thanks for stopping by today for this vellum shaker card using Ink to Paper's new Feathered Friends 6 Mini and Just Sentiments: Together stamps.  This card was so much fun to make! 


I started my card by die cutting a circle onto the center of a Sweet Blush cardstock panel.  I then stamped my sentiment from the Just Sentiments: Together stamp set onto a piece of vellum that I die cut using the Love to Layer: Scalloped Circles dies, heat embossing it in white.  I then adhered it to the top of the die cut circle. 


I then stamped my bird using the Feathered Friends 6 Mini stamp set and die cut it with coordinating dies.  Then came the foliage: I used the Framing Fall Sentiments, Floral Christmas, and Tree Essentials stamps to create my foliage, adhering it around the perimeter of my scalloped circle.  I splattered the entire card with white paint before adhering my bird to the card. 


I then added some Buffalo snow to the interior of the card before adding a backing panel popped up with foam tape.  My photographs didn't allow for the snow to show, but it's such a fun effect in real life! 


I had a blast making this card and I hope you enjoyed it as well!  Links to the products I used are above.  I'll see you again soon with another Ink to Paper project! 


Die Cut Shaker Card Featuring Ink to Paper's Vintage Lantern Stamps and Border Bling: Twinkle Dies


Hello, friends!  Thank you for stopping by today for this die cut shaker card featuring Ink to Paper's new Vintage Lantern stamps and dies and Border Bling: Twinkle dies.  I am absolutely in love with the Vintage Lantern stamp and die set and I'm so excited to show you how this card came together. 


I started my card by stamping my lantern on white cardstock using gray and black inks.  I die cut the center using the coordinating dies and adhered a piece of acetate in the window.  I created some snow using buffalo snow and clear glitter and sprinkled it onto the window.  After stamping the candle and backing piece for the lantern, I assembled it using two layers of foam tape to give room for the snow to shake around.  I then stamped my floral images onto white cardstock, colored them with Copic markers, and die cut them with the coordinating dies. 


To assemble the card, I die cut the On the Border: Sunburst Frame die from white cardstock and adhered it to a base with a pink gradient.  I then cut a patterned paper circle using the Love to Layer: Scalloped Circle dies and popped it up in the middle of the Sunburst die cut using foam tape.  I then adhered my lantern on top and arranged my florals in the corners.  I used the new Border Bling: Twinkle die to cut some stars from gold glitter cardstock and scattered them around my frame.  I then stamped my sentiment on Classic Kraft cardstock, die cut it with the Banner Builders: Basics dies, and added some pink stitching for added interest. 


I absolutely adore this new Vintage Lantern stamp and I hope you do, too!  Links to the products I used are above.  Thanks for stopping by and I'll see you again soon with another new Ink to Paper project! 


Thursday, November 12, 2020

Stitched Card Featuring Ink to Paper's Just Sentiments: Get Well Stamps


Hello, friends!  I am so happy you stopped by for this stitched card featuring Ink to Paper's new Just Sentiments: Get Well stamps.  Stitched cards are my jam, and I'm thrilled to share the process with you today! 


I started my card by cutting a circle out of white cardstock.  I then traced a smaller circle in pencil inside the perimeter of the circle.  I used this pencil circle to stamp florals and foliage from the Pleasing Envelopes: Special Delivery, Graceful Wings, and the new Deer to Me stamp sets in shades of dusty pink, cocoa and chartreuse green.  Then the fun began: the stitching!  I used coordinating shades of embroidery floss to stitch around the circle and to add details to the leaves and other foliage.  To finish the embellishing, I added french knots and some floral sequins around the floral frame. 


To finish my card, I stamped my sentiment from the Just Sentiments: Get Well stamp onto a circle of polka dot paper.  I adhered this paper to a larger circle of vellum and added some stitched details around the edge.  After adhering this to the center of my card, it was finished! 


I had so much fun creating this project and I hope you enjoyed it, too.  Links to the products I used are above.  Thanks so much for stopping by and I'll see you again soon with another project featuring new products from Ink to Paper! 


Handmade Card Featuring Ink to Paper Brighter Days, Feathered Friends 6 and Cover Plate: Ornate Stamps and Dies


Hello, crafty friends!  I'm so happy you stopped by today for this card I made using products from the new Ink to Paper November release.  Keep reading to see how these elements came together! 


I started my project by creating my bird with the new Feathered Friends 6 dies.  I die cut the pieces from white cardstock and used Distress Oxide Inks and sponge daubers to color my bird.  After assembling the pieces, I used the Love to Layer: Scalloped Circle dies to cut two layered circles with vellum and patterned paper.  I then used the Framing Florals stamps and dies to create floral embellishments by stamping them onto white cardstock and coloring them in with Copic markers.  I then adhered the florals around the edge of the larger circle and affixed my bird to the middle. 


To create the base of my card, I chose a panel of Weathervane cardstock and adhered a strip of yellow floral patterned paper across the middle.  I die cut a panel using the new Cover Plate: Ornate die (which is GORGEOUS) from white cardstock and affixed it over the gray panel.  I popped up the center circle with some foam tape in the middle.  I then stamped my sentiment on patterned paper and cut it out with a die from the Banner Builders: Basics dies.  I added some quick stitching around the edge using pink cardstock. 


I hope you enjoyed this project!  Links to the products I used are above.  I'll see you again soon for another project featuring new products from Ink to Paper.  Thanks for stopping by! 


Wednesday, November 11, 2020

Stitched Accents with Ink to Paper's Deer to Me Stamp Set and Border Bling: Believe Dies


Hi, friends!  Thank you for stopping by today for another creation made with Ink to Paper's November release.  This card features the new Deer to Me stamps and dies and the new Border Bling: Believe dies.


I love deer images, and these in particular were perfect for adding some stitched accents (my favorite way to add interest and texture to a card).  I began by die cutting my deer from woodgrain cardstock.  I die cut an oval using the Geometrix: Oval dies using Sweet Blush cardstock.  I then stamped some foliage around the base and perimeter of the oval and adhered my deer.  After stamping the antlers, I did a quick and simple backstitch to add some texture to the card. 


For the remaining embellishments, I used the Twig Wreath stamp set to stamp florals in Hibiscus Burst and Sweet Blush inks.  I also used the Tag Creations: Blooming Indulgence die set to create some leaves.  I added some simple stitched details to these florals before adhering them around the border of the oval. 


To finish the card, I die cut a base using the new Border Bling: Believe die with coordinating cardstock.  I added a strip of patterned paper down the center then added my oval, using foam tape for dimension.  I added some additional foliage around the center oval for interest.  


I hope you enjoyed this project!  Links to the products I used are provided above.  I'll see you again tomorrow with more Ink to Paper projects! 

Ink to Paper November Release: Winter Woodlands Shadow Box Card


Hello, friends!  Welcome to Day 1 of Ink to Paper's November release!  I'm so happy you stopped by for this fairytale-themed shadow box card made with the beautiful new Winter Woodlands stamps and dies.  


As soon as I saw this set, I immediately thought about giving it added depth and dimension by making a shadow box card.  If you've never made one before, I highly recommend giving it a try - it is really easy and really brings your card creations to life.  Jennifer McGuire has an excellent tutorial here; this is what I used to learn how to make these beautiful cards. 


I decided to use a soft, fairytale-inspired color palette for my card, choosing pale lavender, mint and pink shades.  After stamping my sentiment on vellum and heat embossing it in silver, I used the coordinating dies to cut out all of my elements and assembled the card.  I used the Starflakes die set and the new Border Bling: Twinkle die to embellish the outside of my card.  


I hope you enjoyed these projects!  Be sure to stop by all week to see more projects made with the new Ink to Paper release.  I'll see you soon!  

Custom Post Signature

Custom Post Signature