Tuesday, March 27, 2018

Sizzix Animal Portraits Card


Happy Tuesday!  With Easter approaching and spring hopefully showing up this week, there is no better time for a bunny card.  I don’t make a whole lot of cards with cute critters on them, but this one might have changed my mind.  I came across the Sizzix “Animal Portraits” die and I had to have it just for this bunny (it also comes with an adorable bear and cat).  And then decided that she needed a cute outfit and a crown of flowers.  😊  After die cutting the bunny and stitching her facial features, I stitched her a little top made of wool felt embellished with Honeybee Stamps flower sequins and Pretty Pink Posh sparkling clear seed beads.  


The flower crown is made of handmade mulberry rosettes that I’ve had in my stash for years, tiny flowers from Simon Say Stamp’s Blooming Circle die, and branches from Pinkfresh’s Dainty Botanicals stamp set.  I outlined the branches with a copic multiliner to match the sketchy look of the stamped images on top of the frame.  

I then die cut a frame out of Waffle Flower’s Lacy Layers dies (LOVE these dies… I use them ALL THE TIME) and stitched the little holes around the die.  For the background, I used Pinkfresh patterned paper and embellished it with Kat Scrappiness flower sequins and Pretty Pink Posh sparkling clear seed beads.  I added the “hi” sentiment from Simon Says Stamp’s Handlettered Encouragement set.  


Some more Pinkfresh blooms from their Fleur 1 stamp set colored with Zig Clean Color Real Brush pens finished off the frame and the card.  


My daughter loves this bunny and named her Francine.  I hope she brings a smile to your face!  

Thursday, March 22, 2018

Cross Stitching on Cards With No Dies


Happy Thursday, everyone!  I have to preface this post by saying that I warned you… I was going to make something with a flower.  And I am a girl who is true to her word!  😂  I am so excited about this card.  I was curious to see if I could try a technique for stitching on cards that doesn’t require the use of any special dies.  This is the result.  It is easy, fun, and VERY addictive (I have already started on my second card in a day 😬).  

This tutorial is based on the card I just started (I didn’t photograph the card shown above because I really wasn’t sure I was going to like the way it turned out... lesson learned!)  First, I looked around on Pinterest for a cross stitch pattern I liked.  After copying the image, I pasted it into my word processing program, sized it to fit on an A2-sized card and printed it out.  From there, I cut out the image and temporarily adhered it to my card front.  


I then poked holes in the corner of all the squares.  I promise that this is not as tedious as it sounds… it goes quite fast and was actually pretty meditative.  


When you’re done with the holes, use your image as a guide and start stitching!  Easy peasy cross stitching… no magic happening here.  


Here is a picture of the pattern I started with along with the result.  


When your card is done, the results are stunning.  I love the way the image just floats in the middle of the card without a bunch of surrounding holes; I think it gives it a more modern, updated look.  I also love how you’re not limited to patterns that will fit within the confines of a die.  You can customize the size of your image, the colors… oh, the possibilities! 

I finished my image by popping the panel up on some fun foam for dimension. I added some gold splatters, a Simon Says Stamp love sentiment and some Pretty Pink Posh sequins for sparkle.  I hope you enjoyed this tutorial and I would love to hear if you try this technique!  


Wednesday, March 14, 2018

I Can Make Cards Without Flowers on Them #1: Watercolor Feathers


To look at my Instagram page right now is to be bombarded with flowers.  I personally love it, but I realize that not everyone might appreciate my obsession fascination with florals.  So I have decided to challenge myself to start a series called “I Can Make Cards Without Flowers on Them.”  And here we are with card #1!  Watercolor feathers made with Altenew’s beautiful Golden Feather stamp set.  

This card took some tinkering before I found a method that achieved the look I was going for… slightly soft, but with texture and defined borders.  I pulled out my Spectrum Aqua watercolor markers and colored on the stamp, making sure to mix the colors and place them in different spots across the stamp (excuse the stained stamp… this one got a workout on this card):


Then I started playing.  To achieve a soft look, I tried wetting the paper with a brush (resulting in  images sometimes too soft, sometimes not soft enough) and misting the stamp (way too soft).  Then I tried misting the paper and blotting up a little of the water with a paper towel.  Bingo!  Just soft enough.  


After stamping the panel and letting it air dry, I embossed the images with Ranger Gold Tinsel embossing powder and added some gold splatters.  I then die cut the whole panel with My Favorite Things wonky rectangle die and stitched it up in gold thread.  I stamped and embossed an extra center image and popped it up.  Some Pretty Pink Posh gold sequins and it was finished!  


Here is a sample of some of my practice feathers.  This technique will likely vary a little depending on the markers and paper you use (I used Arches cold press 140 lb. watercolor paper).  It is fun playing around, and I’m looking forward to using this with different mediums. 


Have a great day… I am off to make something with a flower.  😂  


Thursday, March 8, 2018

Simon Says Stamp Best Days Release!


It's Simon Says Stamp release day!  I was SO thrilled when they asked me if I would like to create a project with a new product, and I squealed when I received their Bold Flowers stamp set.  There are so many looks you can achieve with this set - everything from modern and graphic to soft and pretty. I decided to take a hybrid approach and try a modern watercolor look.  I stamped the images with bright and colorful watercolor markers using my favorite Winsor & Newtons and Zig clean color real brush pens.  Here's a glimpse into how I did it.  

It really helps to use a stamp positioning tool in case you need to stamp an image twice, so I used my Misti.  I colored the stamp with a watercolor marker and stamped it.  


Your image will not look perfect and that's OK!  Next, take a damp brush and blend out the color: 


Looks better, right?  From there, I let the image dry and added layers of color as I wanted (always letting the image dry between layers so I didn't end up creating a muddy mess): 


After I was done watercoloring the panel, I cut a frame out of the edge using rectangle dies, did some stitching around the outer border, and popped it up using foam tape.  I then recessed the remainder of the panel inside the frame.  I watercolored a scrap in Payne's gray and die cut Simon's "Miss You" greeting.  I LOVE these sentiment dies... what I wouldn't do for Kristina Werner's handwriting!  😍  Some Pretty Pink Posh clear droplets and some Nuvo crystal glaze drops and the card was finished.  


I hope you enjoyed this tutorial and card.  Be sure to check out Simon Says Stamp's new "Best Days" release.  It has something for everyone... I just love it.  ❤️

Tuesday, March 6, 2018

Die Cut Ampersand

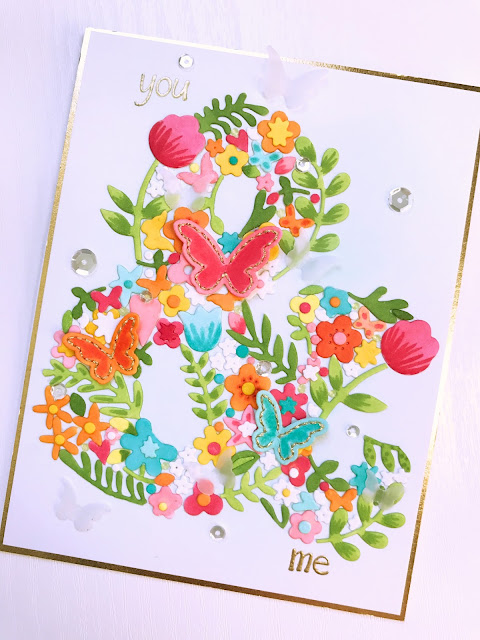
I hope you are having a great start to your week!  So, as is apt to happen around here, I recently lost my crafty mojo.  I always seem to find it through die cutting.  I had some little foliage pieces lying around from my "Love" card (you can find it on my Instagram page), so I started coloring and die cutting little flowers.  I might have gone a little overboard, because before I knew it I had a TON of tiny colored pieces lying around.  I love illustrations that combine lots of small details into a larger image, so I decided to try to put these together into an ampersand shape.  I sketched out a rough ampersand and started glueing.

I'll be honest... I almost aborted the mission a  few times.  It looked like a HOT MESS.  But after my kids assured me that they could "kind of" see an ampersand, I pushed forward.  And after glueing a bajillion pieces, I almost cried happy tears when my husband saw it and said, "Oh... an ampersand!"  😂  So my advice to those taking on a project like this... don't give up!

Another tip... don't be afraid to alter the shape of your die cuts to make them fit.  I cut petals off flowers, leaves off stems... whatever I needed to do to make a shape fit into a space.  And the less white space there is within your shape, the better.  When you're combining little shapes into a larger form, white space actually makes it look busier and messy.  And the fuller the image, the clearer its borders become.


To cut the little flowers and leaves, I used Simon Says Stamp's mini flowers and leaves die, My Favorite Thing's fab foliage die, Altenew's spring showers cover die.  All were cut from Neenah Solar White 110# cardstock and colored with copics.  To finish it I stitched up some beautiful stitched butterflies from Poppy Stamps and added tiny Memory Box vellum butterflies.  A sprinkle of sparkling clear sequins from Pretty Pink Posh and some Nuvo crystal drops, and the card was done!


I should call this card "Wishful Thinking for Spring" because we are expecting 12 inches of snow tomorrow!  😳  To everyone in the line of this storm, stay safe and warm tomorrow!

Custom Post Signature

Custom Post Signature